Arietta G25
On my way building an automated wireless home automation system I have been finally been drawn to Embedded Linux. It just makes sense. Driving Internet of Things devices based on Arduino or other directly programmed MCUs is not very efficient. You will have so much work with just building up a network stack for example based around a CC3000 (Available as a nice breakout board from Adafruit). And you will just redevelop what is available for linux for decades. But: Embedded Linux is a beast of a monster. It’s just a whole different universe.
There are so many devices to choose from, the most prominent example being the Raspberry Pi of course. But I wanted a solution that I can use for a final product. For my work I need a very small device and I don’t need all these connectors (Ethernet, HDMI, etc) so I have been searching the large catalog of SoMs (System on Module) and found “Arietta G25” by Acmesystems. I really love this little device and Acmesystems provides a lot of tutorials and help documents to get started quickly.
Find more infos about their great product line-up here: acmesystems.it.
After I had attached a 3.5 TFT (acmesystems has a well written tutorial on how to do that) I wanted to use it for a great User Interface. As you don’t want to build your own UI-System you will most likely find Qt. Qt is more than just a UI frameworks. It’s awesome as it features more or less the same as the whole Apple iOS system. It features it’s own (great) IDE, Interface-Builder for doing design work the WYSIWYG way and features an almost complete Framework with hundreds of C++ classes for all kinds of stuff. They even have a well written network stack helping a lot in doing IoT stuff.
But: Getting Qt to run on an embedded linux device is not that easy. It’s hard work. Requires hours of hours of your time building stuff. Of course there are systems like Yocto and Buildroot – I just got started with them and so far I don’t see it’s easier. As acme systems provides a few images to get started, I wanted Qt installed based on the acme systems solution.
Warning: Work in progress! During my journey of installing Qt on my Arietta G25 I wrote a log. But I am not sure if I really have writen down each and every step. If something is missing, or something does not work then please don’t hesitate and write a comment so we get that sorted out. My goal is to have a comprehensive and working tutorial on how to get Qt up and running on Arietta G25 and other AT91 based Atmel SoMs.
Getting your head around cross compilation
As you might know the Arietta G25 and a lot of other low power linux machines are based around an ARM-Core. ARM is a complete different architecture as your Intel-Based workstation (I assume you are working on some standard Machine). That means that code, that is compiled for Intel does not work for ARM and the other way around. Therefor you must have a system that is able to build a binary for another architecture. This is called cross compilation. Of course you could just compile everything on your small embedded device using standard linux configure, make, make install calls (in most cases), but remember: You are running a small linux system because power and size and price is more important to you than power ;-). It would take ages to compile Qt on a such a small device, also it should be possible with enough RAM and resources.
In general cross compilation is just another compiler, linker, etc. that is not creating native x86 code (for Intel based CPUs) but generate RISC-based native code for ARM devices. This is what Apples Xcode does. It uses special compilers, linkers, etc. if you are building an iOS-App and uses another compiler and linker for Intel based code if you create a Mac-App.
The main problem with cross compilation is package dependency. Most apps rely on external libraries. And these external libraries perhaps rely on other external libraries. In order to cross compile a software you will need all dependent libraries for the specified architecture.
After my first attempts with cross compilation I understood why Intel’s Edison got quite some hype. As it’s an Intel based device you don’t have all these issues. Compile the software on your workstation, copy the binary and you are good to go. But that is a whole different story though.
Preparing your workstation
In order to get cross compilation of Qt up and running you will have to fulfill a few prerequisites: The main being that you must do your cross compilation stuff on a linux machine. I have set up an Ubuntu 14.10 on my Mac in my Parallels Desktop Virtual Machine software. That runs very good and has some great features: Just make Snapshots on your way. And if you have misconfigured your workstation or killed something useful: Just go back to an earlier Snapshot.
Acmesystems has some great tutorials on Cross Compilation and I have done them too I recommend you to go through them as you will will have prepared your Workstation or VM the same way as I did.
Please follow this tutorial: Install the ARM cross compiler toolchain on your Linux Ubuntu PC.
My way of getting rid of cross compilation issues with libraries has been time consuming but effective. I am currently investigating better methods of doing that and my favorite so far is Buildroot. What I did is: Run the embedded device, install the development libraries there and then scp (copy) them on your workstation. This way I do not need to cross compile all libraries from source but can just use the debian package manager available on my Arietta G25. When compilation stops with an error I just install the dev package on Arietta G25, copy it them back to my host and rerun the compilation until finish or the next error. That is surely not the best way to do things, but it get’s you to the finish line and the result is good enough for prototyping and playing around with an embedded linux device.
In order to be able to compile Qt “my way” you will need an Arietta G25 as prepared in the Getting Started Guide of Acmesystems. Please follow this tutorial if you have not done yet.
That’s enough of theory, let’s get started with compiling Qt for your Arietta G25.
Installing tslib
As I wanted Qt for building touch screen interfaces I wanted to install tslib. Tslib is a library that will allow you to test and calibrate your touch screen. As most resistive touch screens need calibration we will compile Qt with tslib. This way Qt will use the calibrated touch screen.
On your Arietta G25:
> apt-get install libts-dev
This will install the tslib on your Arietta G25 along the header files and libraries need later on your workstation. The debian website lists the files installed by the package manager for tslib here.
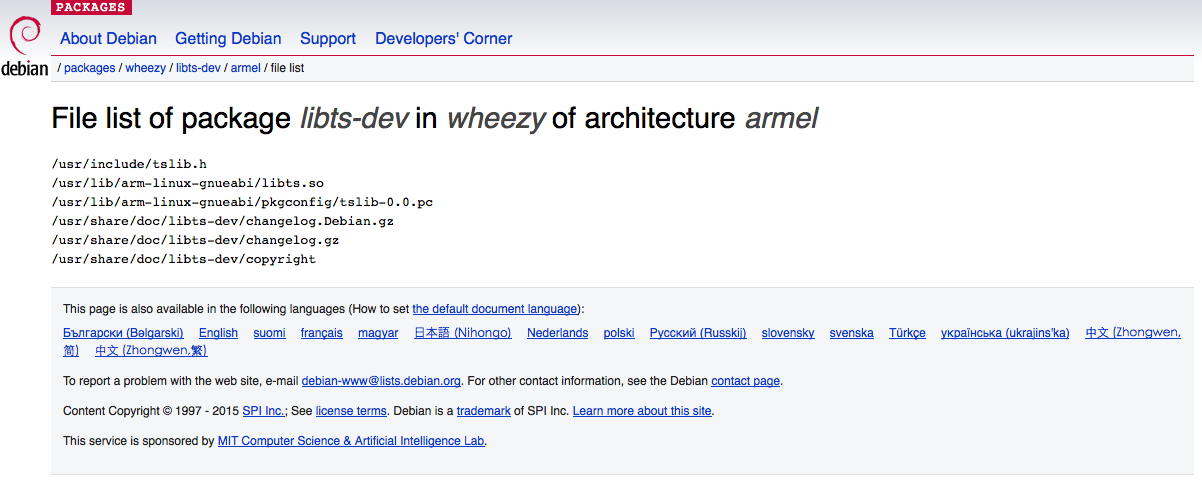
As you can see the header files are installed in /usr/include and libs are installed in /usr/lib/arm-linux-gnueabi. As libs on your host system for our host system are installed in /usr/lib we will not have any problems with overwritten libraries.
Preparing ARM libraries on your Host Ubuntu PC
As said before we will copy the ARM-libraries on our Ubuntu PC and reference them later. Please make sure that these folders exist on your Ubuntu PC:
/usr/include
/usr/lib/arm-linux-gnueabi
If they do not exist, you have to create them:
> sudo mkdir /usr/include
> sudo mkdir /usr/lib
> sudo mkdir /usr/lib/arm-linux-gnueabi
Important: I have followed this tutorial at acme systems and installed bonjour. This way I can address my Arietta with a name arietta.local and not with it’s IP-address which should be 192.168.10.10 if you have followed Acmesystems getting started guide and your Arietta G25 is connected via USB to your PC. If you do not want to install bonjour or it’s not working, then please replace “arietta.local” with the IP-Adress your Arietta G25 is reachable via SSH.
> sudo scp -r root@arietta.local:/usr/include/* /usr/arm-linux-gnueabi/include
> sudo scp -r root@arietta.local:/usr/lib/arm-linux-gnueabi/* /usr/arm-linux-gnueabi/lib
This will copy the includes and ARM libraries to your Ubuntu PC.
Cross Compiling openssl.
We want to build secure stuff, won’t we. So we have to make sure Qt can make use of SSL. We have to build openssl. On your Ubuntu PC download openssl from this site: Download OpenSSL Source. I have chosen the latest version (at time of this writing: 1.0.11. Extract the source on a temporary build directory on your Ubuntu PC. In a terminal shell navigate to the folder where you have extracted the openssl source code and run this command on your Ubuntu PC:
> ./configure dist --prefix=/usr/local/arm/ssl --openssldir=/usr/local/arm/ssl
Now we have to set the cross compiler as we want to build an ARM binary file from this source:
> export cross=arm-linux-gnueabi-
Now run this command to build the openssl library:
> make CC="${cross}gcc" AR="${cross}ar e" RANLIB="${cross}ran lib"
After some time you should have compiled openssl for your ARM device. Install the library with this command:
> sudo make install
This will install the libraries on your Host Ubuntu PC in the directories we have selected in the configure command.
Preparing your VM for acceptable Qt build times
Ready for prime time? This will take some time. We talk about hours! If you are running a Virtual Machine you should give your VM a little bit more power than the default selection. You will also need quite a bit of RAM. These are my settings for my Parallels Desktop based Ubuntu virtual machine:
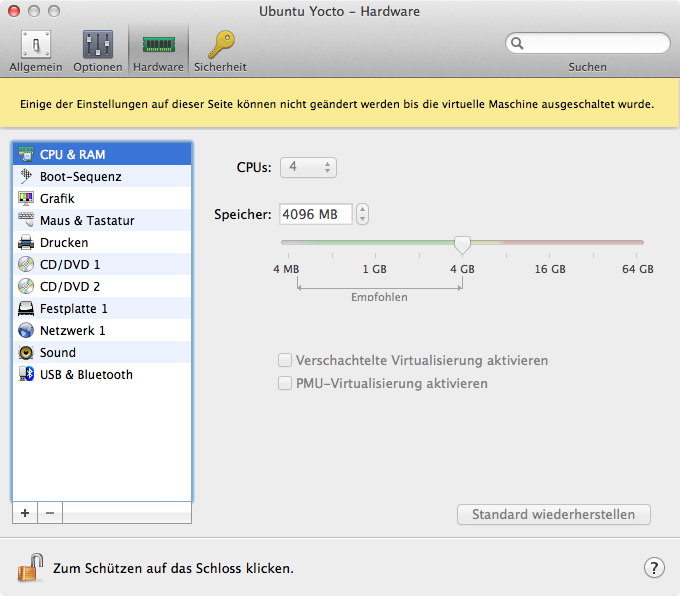
I am running the VM on an Quad Core iCore i5. As you can see I pimped my VM with 4 CPUs and 4 GB of RAM. That is quite a lot and don’t expect your VM Host (in my case Mac OS X Yosemite) to be a winner wile running your Ubuntu VM.
In order to adjust settings you likely have to shutdown your VM, adjust settings and boot it up again.
Building Qt 4.8.5 for Arietta G25
Yes. Really. We will compile Qt now. Really. Nothing is in the way anymore. Let’s get (really) started:
Finding Qt 4.8.5 on the official website is quite a pain in the ass. Just download this package. Now extract the downloaded tar.gz on your Ubuntu PC, start a terminal wheel and navigate to that folder. Then run this command:
> ./configure -embedded arm -xplatform linux-arm-gnueabi-g++ -little-endian -prefix /usr/local/arm/qt/4.8.4 -no-qt3support -no-webkit -no-xmlpatterns -no-multimedia -no-audio-backend -no-javascript-jit -no-scripttools -no-opengl -nomake demos -nomake examples -declarative -no-fast -qt-mouse-tslib -openssl-linked -v -I/usr/local/arm/include -L/usr/local/arm/lib/linux-arm-gnueabi -I/usr/local/arm/ssl/include -L/usr/local/arm/ssl/lib -L/usr/arm-linux-gnueabi/lib
What a monster. Isn’t it. This will install a quite bare bones Qt, but has everything you could need on an embedded linux system. I selected not to build examples and demos (saves a lot of compilation time). If you want them so be compiled drop the parameters -nomake examples and -nomake demos.
As you can see I have added our include and lib folders where we have copied the ARM libraries and added the folders for openssl libraries and include files. The parameter -qt-mouse-lib will make sure that Qt will later use tslib for our touch screen input.
If configure runs through you have made a good step towards having Qt running on your Arietta G25. It took a lot of time to find the correct combination of configure parameters. Just use them as described here. You can later tune them, but if it does not work we never know if the problem is my tutorial or your configure command ;-).
The configure command will output a lot. Please make sure to scroll through all messages from configure and make sure that the summary of libs makes sense to you. If an important lib is missing: Install on Arietta G25 with apt-get install lib-xxx (in most cases) and copy the libraries and includes back to your Ubuntu PC as described earlier in Preparing ARM libraries on your Host Ubuntu PC. Rerun configure and make sure the library has been detected.
Now build Qt running this command. The parameter -j sets how many cores will be used for compilation. It depends on what you want to do during compilation time. If you want to cut your latest Basejump video you will better use -j1 or -j2 (using 1 or 2 cores). If you will go to bed I suggest you use the number of CPUs given your VM -1. So in my case:
> sudo make -j3
Good night… See you tomorrow ;-)….
Good morning. I really hope the compilation process went fine and make did stop without and error. If you got an error scroll up until you find the reason. Do not stop scrolling at the first error, scroll up until everything looks good. Then scroll down slowly and closely watch the messages. The first error you find will help you most. C/C++ often outputs error messages that are not very helpful. Copy the error message and search for it @ Google. But leave out any personal directories!
If everything went fine, install Qt on your host Ubuntu PC with
> sudo make install
Installing Qt on your Arietta G25
Congratulations! You have compiled Qt! With tslib and openssl. That’s awesome. You will love it. But before you will have to install Qt on your Arietta G25.
On your Arietta G25:
> cd /usr/local
> mkdir arm
> cd arm
> mkdir qt
> cd qt
> mkdir 4.8.4
> cd 4.8.4
On your Ubuntu PC
> cd /usr/local/arm/qt/4.8.4
> tar -czvf qt.tar.gz *
> scp qt.tar.gz root@arietta.local:/usr/local/arm/qt/4.8.4
On your Arietta G25 make sure you are in directory /usr/local/arm/qt/4.8.5. Make sure the file qt.tar.gz has been uploaded by checking with ls. Then run this command:
> tar -xzvf qt.tar.gz
This will extract Qt on your Arietta G25.
You are so close now. Really close ;-).
Preparing Qt to use your touch screen and tslib
You will have to configure tslib if you haven’t done that. I assume your screen is working correctly and you have successfully managed to run Acmesystems tutorial on installing a small TFT on your embedded device. Of course you can drop this step if you just want to use Qt for networking stuff or without using a touch screen.
Run these commands:
> export TSLIB_FBDEVICE=/dev/fb0
> export TSLIB_TSDEVICE=/dev/input/event0
This will tell tslib to use the linux frame buffer on fb0 and the touch device on /dev/input/event0. Perhaps it’s event1 or fb1. Use ls in /dev and /dev/input to find out.
Run this command to calibrate the screen:
> ts_calibrate
Now run this command in order to set Qt to use tslib:
> export QWS_MOUSE_PROTO=Tslib:/dev/input/event0
Remember to solidify your exports! Exports get lost after reboot. So make sure to rerun these commands or add them to /etc/environment, i.e. open /etc/environment in vim or nano (which I prefer – apt-get install nano) and add these export commands there.
Just call
> export
to get a list of export variables and make sure that these variables have been set. If it has been working and at some point stopped working, you will very likely don’t have these variables set anymore. This should always be the first thing to check before doing anything else!
Preparing Qt Creator
On your Ubuntu PC download Qt from the official website (5.4 at time of this writing). I chose the community edition. Extract it and install Qt creator. Start Qt Creator and select the menu Tools->Options.
Adding the Arietta G25 device
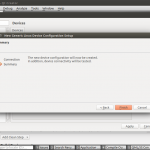
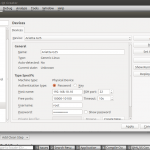
On the left side select Devices (at the bottom of the list of options), click on Add… and select Generic Linux Device and enter the values for your Arietta G25. You can see the procedure and my settings in the gallery below.
Very important: Click Apply on the lower right corner of the Options Dialog Box. This makes sure that other options will have the newly created device in the lists.
Setup the Build environment
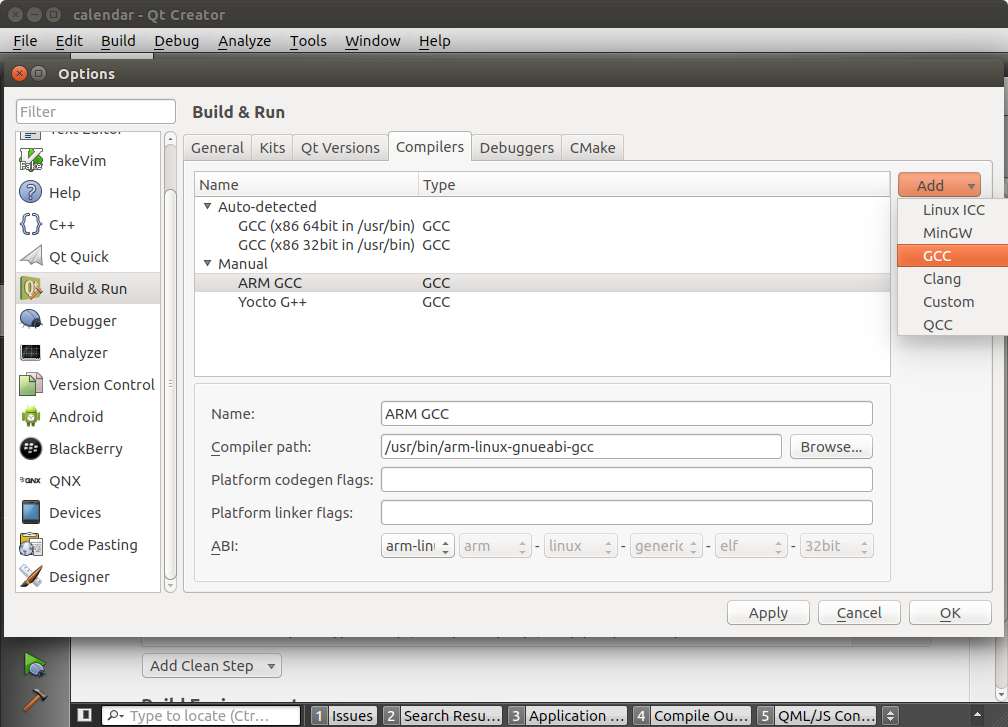
On the left side select Build & Run. Choose the Compilers tab. Click on Add and select GCC from the drop down. I named my compiler ARM GCC. You can see the settings I entered in the screenshot below:
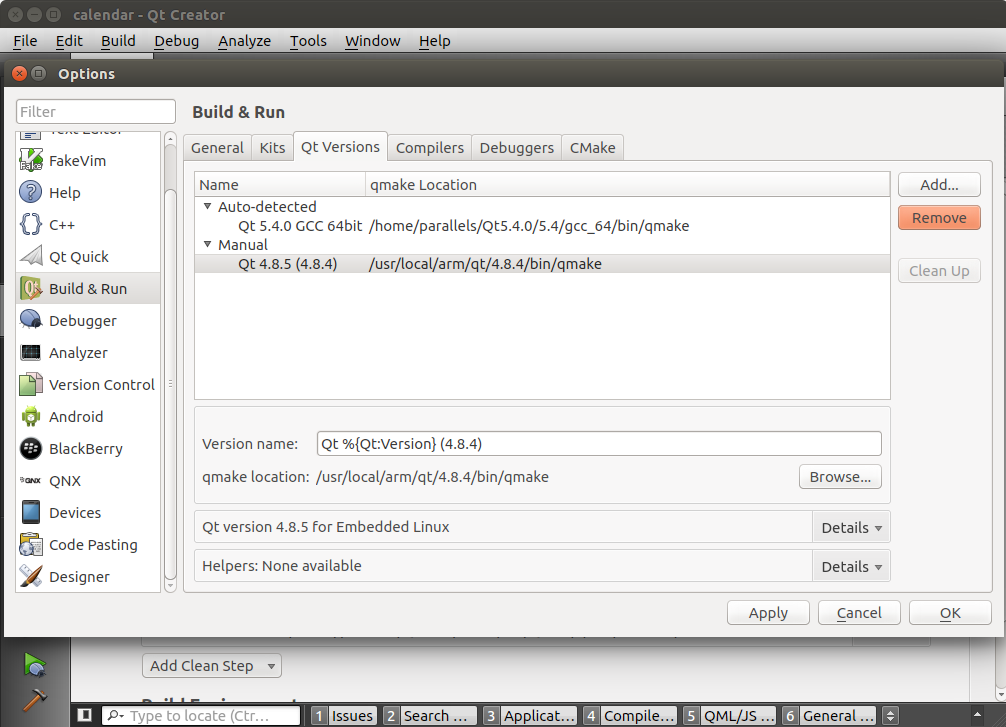
Now select the Qt Versions tab, and click on Add. A standard file select dialog will open. Navigate to this folder:
/usr/local/arm/qt/4.8.4/bin/qmake
Now comes the funny part: Setting up a Kit. A kit combines all the different parts of Qt into one entity. A kit is some kind of a target combined with a device for easy deployment. It’s much like building and testing apps for iOS!
Click on Kits tab, click on Add and enter/select these settings:
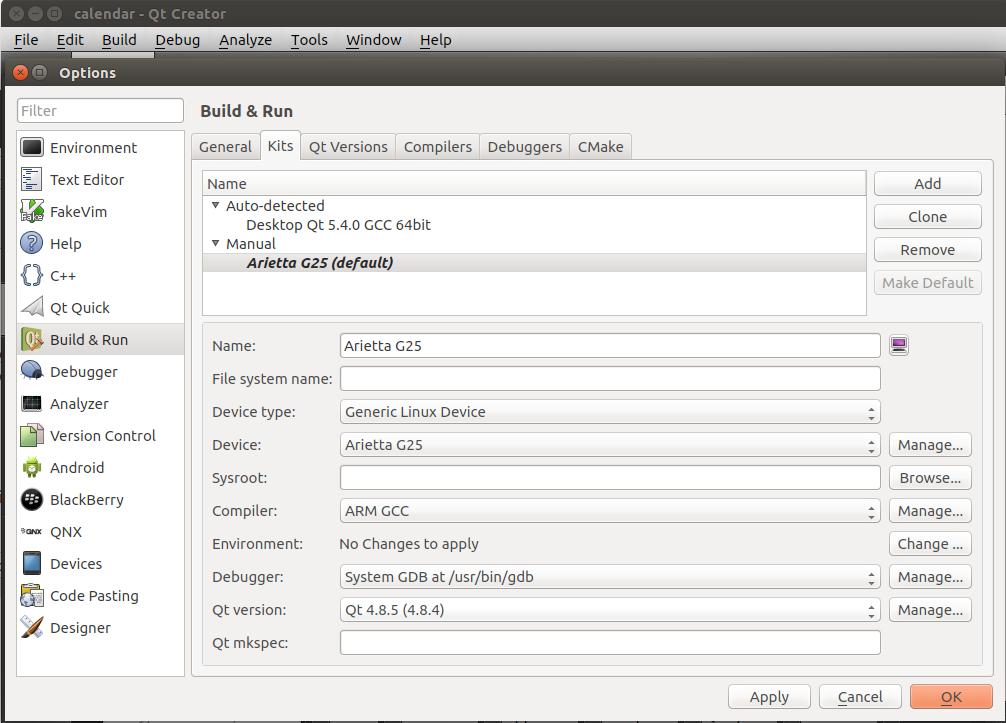
If you do not find something in the list you have forgotten to press “Apply” before. Click OK and restart the dialog with Tools -> Options, then the lists should be populated with the items.
Click OK to close the dialog box.
Last settings
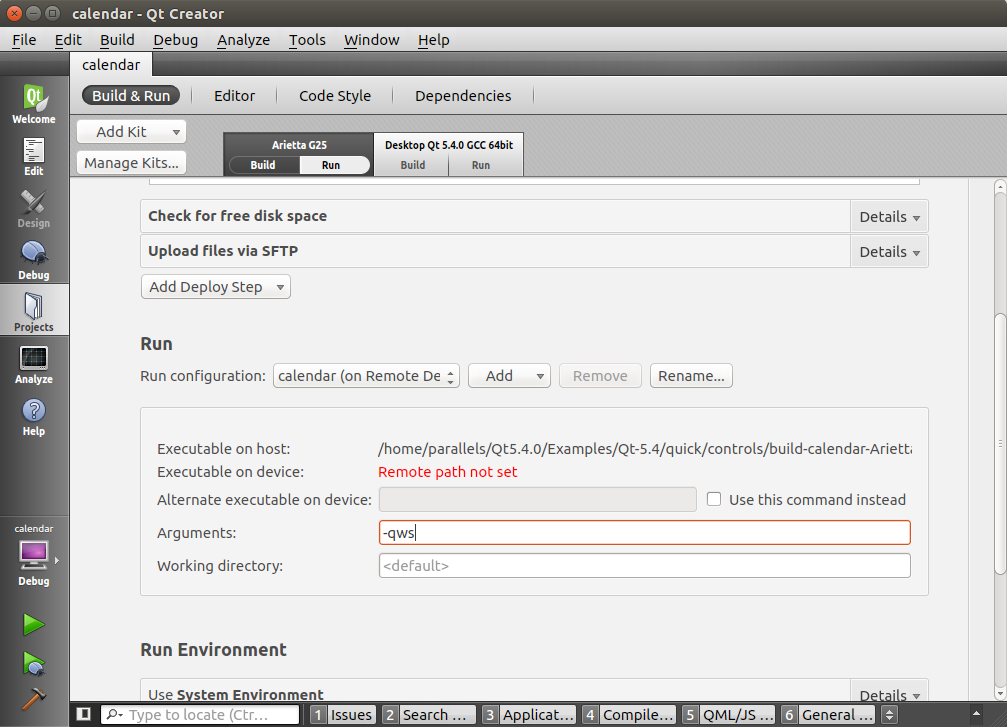
Qt Apps will need to run with the QWS-System. This is some sort of a windows manager. In order to tell Qt apps to use QWS we have to add -qws command line parameter. We can set this parameter in the Project Pane. If you have not done so yet you will need to add the Arietta Kit to the configuration. Click on Add Kit and select Arietta G25 from the list. Click on Run in the Arietta G25 tab as we want to set the deployment settings and enter -qws in the Arguments edit box (you will have eventually to scroll a bit down to find it) as shown below:
That’s it. On the left lower side of Qt Creator you can select the Kit to run. Select Arietta G25 and Debug and click on the Play-Icon. That will build your Qt application, deploy it on Arietta G25 and runs it.
If everything went fine you should now have your App running on Arietta G25!


Awesome details and I look forward to getting to this over the weekend, if time permits!!
I look forward to seeing more from you.
This process is almost identical for QT 5.4.1. The qt configure is slightly different. I copied and stored my arietta libs differently on my Ubuntu machine so ignore all my -Lpaths.
./configure -release -optimized-qmake -no-pch -make libs -make tools -reduce-exports -xplatform linux-arm-gnueabi-g++ -device-option CROSS_COMPILE=arm-linux-gnueabi- -prefix /usr/local/qt-5.4.1-arm -no-audio-backend -no-opengl -nomake examples -v -L/usr/arm-linux-gnueabi/lib -L/usr/lib/arm-linux-gnueabi -L/lib/arm-linux-gnueabi
Hi Phillip! Thank you for this detailed tutorial.
I’m buying an Arietta G25 this month to start working in a project with Qt. This is actually my first time doing anything on a SBC, so it’s like a new world for me. I have two questions, if you’re able to help me…
1 – I already have Qt 5.4.1 installed with QtCreator, downloaded directly from Ubuntu Software Center. So I believe none of the arm flags were set for it, as by that time I didn’t even had linux-arm-gnueabi, etc… In this case, should I really uninstall it and re-do following your instructions? Or is there any way to configure Qt and add the remaining settings?
2 – I saw that in AcmeSystems website they have this tutorial:
http://www.acmesystems.it/buildroot_xterm-01
Where they build kinda from scratch an image for the SD card, instead of using the default one that comes in the build-in Debian when you buy the SD-Card. And indeed, I plan to use X-TERM, but I’m not sure if it is really necessary to create a buildroot fot that or if I can use the default Debian and try to set settings from there…
I’m sorry for the long question, but any help will be welcome! Thanks!
Hello Philip;
Have you ever tried Qt for acme board acqua?
Yes. I did that. It’s a hard ride and I ever wanted to write a blog post about it. I have built a device with the Acqua A5 and a 5 inc LCD display and wanted to drive the UI with Qt 5. There are some issues, though. While you can use some of the features of Qt 5 you cannot use the more modern modules as the Acqua A5 is missing a GPU. All rendering has to be done in software and if your UI is more complex, it will quickly get sluggish.
The best advice I can give you is to use buildroot to build you own custom linux version for the A5. This has been working fine for me. You can basically just select Qt to be added and it will work. Developing and distributing your software is the same as I have described in this blog post.
If I would built such a device again I would rather look at the Raspberry PI zero or Android compatible hardware modules with GPUs.